Showing posts with label Mater Dolorosa. Show all posts

Wednesday, February 28, 2018

Pictures from ICONIC Exhibition, part 1

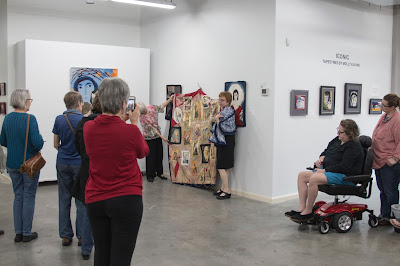
Last Sunday we had the opening reception for my show of tapestries entitled ICONIC.  I was so happy that so many friends and colleagues braved the rain and came out to Southeast Fiber Arts Alliance (SEFAA). 

Photo courtesy Marilyn Kleinhans

Photo courtesy Marilyn Kleinhans

I gave a short artist's talk and was really gratified to hear such thoughtful questions.  Here I'm discussing Mary's Cloak, part of the My Real Name is Mary series.

Photo courtesy Sam Elkind
Mary's Cloak is the one non-tapestry work in the show.  It's inspired by something I read during my preparatory research:  "Mary's azure cloak has been a heavy one for women to bear."  The outside of the cloak is blue velvet, trimmed in gold, typical of Mary's clothing in paintings throughout the centuries (if not historically accurate).  The inside of the cloak is a red rose-printed cotton.  It is collaged with tissue garment patterns.  The pattern tissues are overlaid with images of Mary from paintings throughout history.  These images have been scanned, printed on fabric, and "framed" with ribbons or lace.  In my handwriting the words "ecce ancilla Domini" ("behold the handmaid of the Lord") are repeated over the surface.  At the bottom a scalloped border of beads and fishing weights adds the weight to the cloak.  The label encourages viewers to take it down and try it on.

Mary's Cloak (c) Molly Elkind 2018
71" x 61"
Photo courtesy Sam Elkind
Mary's Cloak (c) Molly Elkind 2018
Photo courtesy Marilyn Kleinhans

Left to right:  Mary (the anxiety of influence), Mater Dolorosa, Mary's Cloak, Mary (Yes)
all (c) Molly Elkind 2017, 2018
Photo courtesy Sam Elkind
Mary (the anxiety of influence) (c) 2017 Molly Elkind
45" x 37"
Photo courtesy Sam Elkind
Mater Dolorosa (c) Molly Elkind
27.5" x 19"
Photo courtesy Sam Elkind
Mary (Yes) (c) Molly Elkind 2017
28" x 19.5"
Photo courtesy Sam Elkind
Here are the earlier pieces in the Mary series:

Mary (a sword shall pierce) (c) Molly Elkind 2013
11.5" x 17.5"
Photo courtesy Sam Elkind
Mary (gilded) (c) Molly Elkind 2014
21.5" x 20"
Photo courtesy Sam Elkind

Mary (greater is what she bore in her mind) (c) Molly Elkind 2015
19" x 15"
Photo courtesy Sam Elkind

Mother/Mary (c) Molly Elkind 2015
15.5" x 15.5"
Photo courtesy Sam Elkind
If you want to know more about the ideas behind this series, click HERE.  Or ask a question in the comments below!

Next time I'll share the other series in the show, Book of Hours, inspired by illuminated manuscripts.


Wednesday, March 1, 2017

You take the high warp, I'll take the low warp . . .

If you're a weaver, you know that one sure-fire way to start a spirited discussion is to ask whether warping from the front of the loom or the back is better.  Everyone has a definite opinion on this question, and the truth is that both methods are good, depending on circumstances (type of yarn, type of loom, type of weave structure) and what you're used to.

I'm wondering lately if the same is true for tapestry weavers regarding whether weaving on a vertical loom (high warp) or a horizontal (low warp) loom is better.   The end results are exactly the same: you can't tell by looking at a finished tapestry what type of loom it was woven on.  There are long traditions of excellent work done on each type of loom.

LeClerc Mira, my first love  loom
Lately I've been weaving on both types of loom and learning first-hand about the differences.  I acquired my first loom, a counterbalance 4-shaft LeClerc Mira, in 2008, specifically because I wanted to learn to weave tapestry and I was assured I could do tapestry on this loom.  But I knew nothing about weaving at all, and to learn I took classes from the good folks at the Chattahoochee Handweavers Guild in Atlanta.  I fell in love with weaving cloth, making scarves and shawls and baby blankets and for years that was the weaving I focused on using the Mira.

But meanwhile I searched for a way to learn tapestry.  To my great good fortune, Tommye Scanlin and Pat Williams, two world-class artist-weavers who live right here in Atlanta/north Georgia, offered a weekend workshop.  Finally I learned what I needed to get started.  I learned on a small copper-pipe loom and eventually upgraded to a Mirrix and then a big Varpapuu rug loom--all of which are vertical looms.  Until now that has been the only way I've woven tapestry.

Varpapuu upright loom
I like being able to see what I'm making right in front of me on a vertical loom, much as a painter does at the easel.  Beating in the wefts with the bobbin or fork is easy because you are working with gravity, packing down.  It's fairly simple to attach a cartoon behind the warp to follow as you build your shapes and design.  And while you don't have to use bobbins to hold your wefts with a vertical loom, I think it helps.  And they are such lovely tools, especially the ones made by Milissa Dewey at Bobbin Boy and John and Joy Moss.

M3 (working title) in progress, (c) Molly Elkind 2017.
Faces are distorted as they wind around the beam. 

I am just now weaving my first tapestry on my horizontal floor loom.  My first loom.  That I bought so I could weave tapestry.  And I'm shocked to discover how much I'm liking it.  For one thing, I use different muscles.  Working at the vertical loom stresses my shoulders a good bit, even if I try not to raise my arms too high.  It feels more natural to me to let my arms work more at lap level.  It also seems easier to sew slits on the floor loom.  And if you build the tapestry line by line, pick by pick, evenly across the width of the design, you can use the beater to pack the weft.  I started working that way on this current project, but eventually my preference for building shapes independently took over, so I'm using a lovely Snipes wooden fork to beat.

Mater Dolorosa in progress, (c) Molly Elkind 2017
And sometimes I use this heavy-duty chocolate splitter my friend Terri got for me years ago.  Since there's no way to attach a cartoon to a floor loom, if you want to use the beater at all, you have to transfer the design to the warp by inking it on the individual warp strands.  I thought it would be a huge hassle to have to ink the warp, but I'm finding I don't mind that too much.  It's kind of nice not to have that rattly paper in the way.  And I find it easier and faster to make butterflies for my wefts rather than winding bobbins, though I have been experimenting with that.

Mater Dolorosa in progress, (c) Molly Elkind 2017
No doubt you more experienced tapestry artists out there have additional thoughts (and probably corrections) to offer.  Tell me, which kind of tapestry loom do you prefer, and why?  Or do you use both?

Wednesday, February 15, 2017

What's looming?

How did it get to be the middle of February already?  I think it's time for a work-in-progress update.

This year's tapestry diary is taking shape.  I'm weaving a 5" x 7" piece for each month, inspired by things I see on my morning walk.  In January I wove irregular bits every day, responding to something I noticed in the landscape or the sky.  Here's January's piece completed and turned to its correct orientation.  Not too bad for weaving without a cartoon or much of a plan.  I like how the gray stripes and dotted lines sort of look like streets I walk on. . . .


This month I'm choosing one color from the morning sky and weaving a rectangle-ish shape,   I finishing with half-passes in red that indicate the date.

For a multi-colored sky like this I choose one hue to weave that day

This one will also be turned sideways. . .maybe it will look more interesting that way!
I'm also moving along on my two bigger tapestries underway.  On Mother/Mary/Me I'm about halfway done:


I'm excited to have Mom's eyes just about completed, though I'm going to tweak the one on our right one more time.  For the record, that would be the fourth try on that eye and the second on the other one.  About the standard number of iterations for me!  I wish progress would come faster on this piece, but I have to admit that I'm distracted by this other, newer one, on the floor loom.


I'm weaving this one from the side so the left-hand edge in the photo is actually the bottom of the tapestry.  This is Mater Dolorosa, a dark, quiet piece mostly done in natural-colored Churro wools. Yesterday I was excited to start weaving Mary's dark blue cloak--you can see a tiny wedge of it on the far left.  This gorgeous indigo is also a New Mexican wool yarn.

You quilters out there have probably given up on ever seeing me complete the queen-size quilt I started about 18 months ago, that's inspired by Turkish ceramic tiles  . . . but the top is mostly done.  I threw it on the bed, over the current quilt, just to see if the size was in right neighborhood.  I have to applique some large shapes to the top edge, and piece the backing, and then it's off to the long-arm quilter.  That will be a great day!


I hope these mid-winter days are offering you a chance to explore new creative ventures too.


Wednesday, December 21, 2016

random thoughts from the studio at Christmas

Yes, the studio is a cluttered mess, and wrapping paper and ribbons have invaded. . . but there are twinkle lights!


On the wall on the far left you can see a rough collage of the design for my next Mary tapestry, on the theme of Mater Dolorosa (Sorrowing Mother).  I have started sampling yarns and colors for this piece with the Churro yarn I picked up at Tierra Wools in November (and some other yarns).  I'm weaving the face sideways and really enjoying that, putting in the lines for the eye and the mouth with soumak.  Excited about the possibilities.  Still hunting for the perfect rich light browns for the skin tones though.. . . and thinking I need to use a finer yarn for the soumak.  Stay tuned.


I want to share with you a poem by Rachel M. Srubas that was included in an Advent devotional I read last year.  Even if you aren't Christian, or are but aren't particularly interested in Mary, I think the message of Mary's strength empowers all of us . . . .

So be it

She has a secret,
though she shares it with heaven and earth.
Heaven imparted it to her, the curving earth cradles it,
neither judges her, and neither calls her a liar.

Fear flew from her like a flock of startled birds
and left her capable of greatness.
All that remained for her to say was so be it.
She said it, and meant it, though she was young.

Why say no?
Why protect yourself from risky blessedness?
You may not be as young as she,
but so what?  So be it, for God's sake.
Try saying it, try meaning it.

Don't just watch her go.
Follow her.
Emulate her urgency, her clear sense of direction.
You have your own heaven-given secrets and capacities,
your own map of the territory that will lead you
to the magnificent life you could live.


My warmest wishes for the peace, joy, hope and strength of the season to your and yours!  Thank you for keeping me company on this journey.

Wednesday, December 7, 2016

A day in the life

It's time for a WIP (work in progress) check-in.  This time I thought it might be fun to share with you "a day in the life" of this artist.  Yesterday, Tuesday 12/6, was somewhat atypical, in that I had no appointments, meetings or exercise classes on the calendar.  A blank slate!  And it was rainy--a perfect excuse to stay inside and work in the studio.

I kissed Sam goodbye at about 7 a.m. and headed downstairs.  I spent 45 minutes working on cleaning up the back of my tapestry diary.  I have tied off the warp ends in fringe on both ends, so it's stable at least.  Because I left so many open warps, it's not as simple as just trimming the weft tails on the back to about one inch.  I have to tack down those tails so they aren't visible from the front.  T-E-D-I-O-U-S!  Note to self:  no open warps on next year's diary!

The back.  The tails at the top are tacked down and clipped, and slits are sewn.

The same area, from the front

Then I wound the last of the skeins of dyed and natural Churro that I picked up at Tierra Wools in New Mexico last month.  I'm thinking of using these for the Mater Dolorosa tapestry that I have in the design stage.  Till now, I've chosen the yarn to fit the tapestry design.  This time. with this thick hairy singles, I'm going to have to adapt the design to the yarn.  That will be interesting.


possible palette for Mater Dolorosa

detail shot of collage in progress for Mater Dolorosa design.  Much work remains.

I fetched the PVC loom with the sample for my current, M3, tapestry in progress and decided there was enough warp on it to do some more sampling.  So I added a hem and wound butterflies from the yarns I want to try.


At 9:30 a.m. I headed to the office to work at the computer, fleshing out the classes I'm offering at SEFAA in the new year.  I'm really excited to share what I've learned about the value of a daily practice in  Discover Your Daily Practice, on January 15.  The following week, in response to requests from my design students last summer, we'll experience a non-threatening method of discussing and evaluating artwork, both others' and our own, in  Art Critique 101.  Three design workshops in Color, Contrast, and Collage will happen in February and March.  Click HERE for more information.  Registration will open in the next couple weeks--I'll let you know!

After lunch I wove for awhile on this piece, whose working title is M3 (for Mary/Mother/Me).  I like how it's going, but it is slow.

I wound the warp up to show the entire piece.  Soon it will begin to wind around the cloth beam! 
After the rain let up I walked Harry and then headed to the Y to swim laps.  For me nothing works so well to get out the kinks in my muscles . . . and my mind!

For me yesterday was pretty much a perfect day.  I am grateful.


Wednesday, November 23, 2016

Adventures in drawing

Here's my dirty little artistic secret:   I can't draw.  Or maybe I should rephrase that, since I always give my students a hard time when they say they can't do something.  I don't draw.  I've never had a drawing class and I don't practice drawing nearly enough to be as good at it as I'd like.  (I'm speaking here of realistic drawing, the attempt to render an accurate likeness.)  

One way I've found to conquer my drawing anxiety and even sometimes made some interesting drawings, is to do blind contour drawing.  Basically the idea is you slowly run your eyes along the contours of an object and use your pencil to trace those contours, without looking at the paper or raising your pencil from the paper at all.  Obviously it will not be an accurate likeness, but the lines that result can be sensitive and engaging. You can find a good 3-minute video tutorial HERE.  I've also used the instructions in the classic book by Betty Edwards, Drawing on the Right Side of the Brain.

I did a blind contour drawing of a hanging plant several years ago that I really like.  I love how it conveys the feeling of an organic descending form without the fussy detail.

U


More recently, on a trip to New Mexico, I stayed in a home where bleached animal skulls of various types and sizes decorated the outdoor patio space.  I really enjoyed photographing and then doing blind contour drawings of this cow's skull:


I love how the contour drawing (done from a side angle) captures the weird shapes and energetic lines of the skull and teeth.


I also did a blind contour drawing of a large wooden bowl.  Simple, but I find it amusing that the shape isn't closed and the edges not connected.


I also drew a candle holder with interesting Aztec-type figures.


I've learned that the most interesting blind contour drawings are of complex objects.  If the object's outlines are too simple there is not much room for eccentric lines and shapes to develop.

For the past week or so I've been working on the design for the next tapestry in my Mary series, a piece on the Mater Dolorosa (sorrowing mother) theme that is one traditional type of Mary icon.  The icon I've been using as my source for previous tapestries depicts a placid Madonna.


I needed a face that expressed grief and sorrow.  Lacking any handy sources, I made a face and snapped a quick selfie.  I deliberately posed looking downward.  Possibly the most unattractive selfie ever!  Go ahead and laugh!


Then I made a quick and loose sketch of the selfie face, adding the iconic veil.  I was eager to plug this image into an overall composition I had in mind so I worked fast and didn't belabor the sketch.


I don't want to overstate this, but this is possibly the loosest, most expressive drawing I've ever done. Maybe all that low-stakes blind contour practice recently loosened me up. Maybe I did the sketch quickly enough that I didn't give myself a chance to get all tight and nervous about drawing.

Today I tried another version, also based on a selfie, with open eyes this time, and the head tilted slightly the other way.


This one I labored over a bit more, and it shows.  Not sure yet which one I'll use in the piece.  Back to the studio. . . .

Have you ever experimented with blind contour drawing?  What was it like for you?

Wednesday, October 26, 2016

The Joy of Finishing

Awhile back I griped in this space about having too many projects underway at once.  I'm happy to report that finally, finally I have got some projects finished, others well underway, and a couple empty looms sitting around, at least for a little while.

I finished the scarf for my sister-in-law, plus three extra for our upcoming show.  Please check my Facebook page for details about that event if you're in the Atlanta area, Nov. 11-13.

tencel and silk-alpaca infinity scarves (c) Molly Elkind

tencel infinity scarves (c) Molly Elkind

I selected several of the collages I've done this year and, thanks to the patient instruction of my dear husband Sam, learned how to cut mats for them.  What an incredible difference it makes to put a mat around something!  These affordable pieces will also be in our show.

collage of painted words and torn paper in sketchbook


dictionary page for "annunciation" and pasted paper collage

L to R:  "Huh?", Red (T)his, Annunciation,  matted and cropped collages (c) Molly Elkind 2016
L to R: Column and Spiral, Weeping for Istanbul, Manuscript/Portal, collages (c) Molly Elkind 2016

I was very happy to finish a set of four 4" x 6.5" small tapestries that I've been thinking of as small contemporary illuminated manuscripts, because they contain or allude to text.  Three of them were inspired by the collages in the top group photo above.  I'm happy overall with how they turned out, but boy, were they fiddly, in both the weaving (12 epi) and the finishing!  I did and re-did the edge finishes, first thinking I would hide the warp fringe (with a half-damascus that would turn the warps to the back) and then deciding to expose it.  I never could get the corners to be as neat as I wanted.  I like that the fringe is visible.  These will also be in our holiday show/sale Nov. 11-13.

Clockwise from upper left:  Huh?, Red (T)his, WTF, and Annunciation, handwoven tapestries  (c) Molly Elkind 2016

I'm still working on the large Mary tapestry, and I expect it to take several more months at the rate I'm going.  I'm discovering just how hard it is to weave a self-portrait.  Just call me Penelope. 

M3 (working title) in progress
Meanwhile I'm designing the next Mary piece, a smaller tapestry on the theme of Mater Dolorosa, the sorrowing or weeping mother.  Goodness knows, if Mary is paying attention at all, she must be weeping over our world.  I'm thinking of incorporating somehow tiny shards of obsidian I've collected in New Mexico, known as Apache tears.  Wonder if I can drill through them so I can thread the yarn through?  Let me know if you have any intel on this.  Would a bead-reaming tool work?

study for Mater Dolorosa, with Apache tears 
So, that's the way things stand here.  Don't ask about the quilt.