%2Bfor%2Bblog.jpg) |
| Mary (greater is what she bore in her mind), handwoven tapestry 12" x 9" (c) Molly Elkind 2015 |
Thursday, March 26, 2015
Latest Mary tapestry finished

Friday, March 20, 2015
The tale of a warp, Part 4: making an infinity wrap
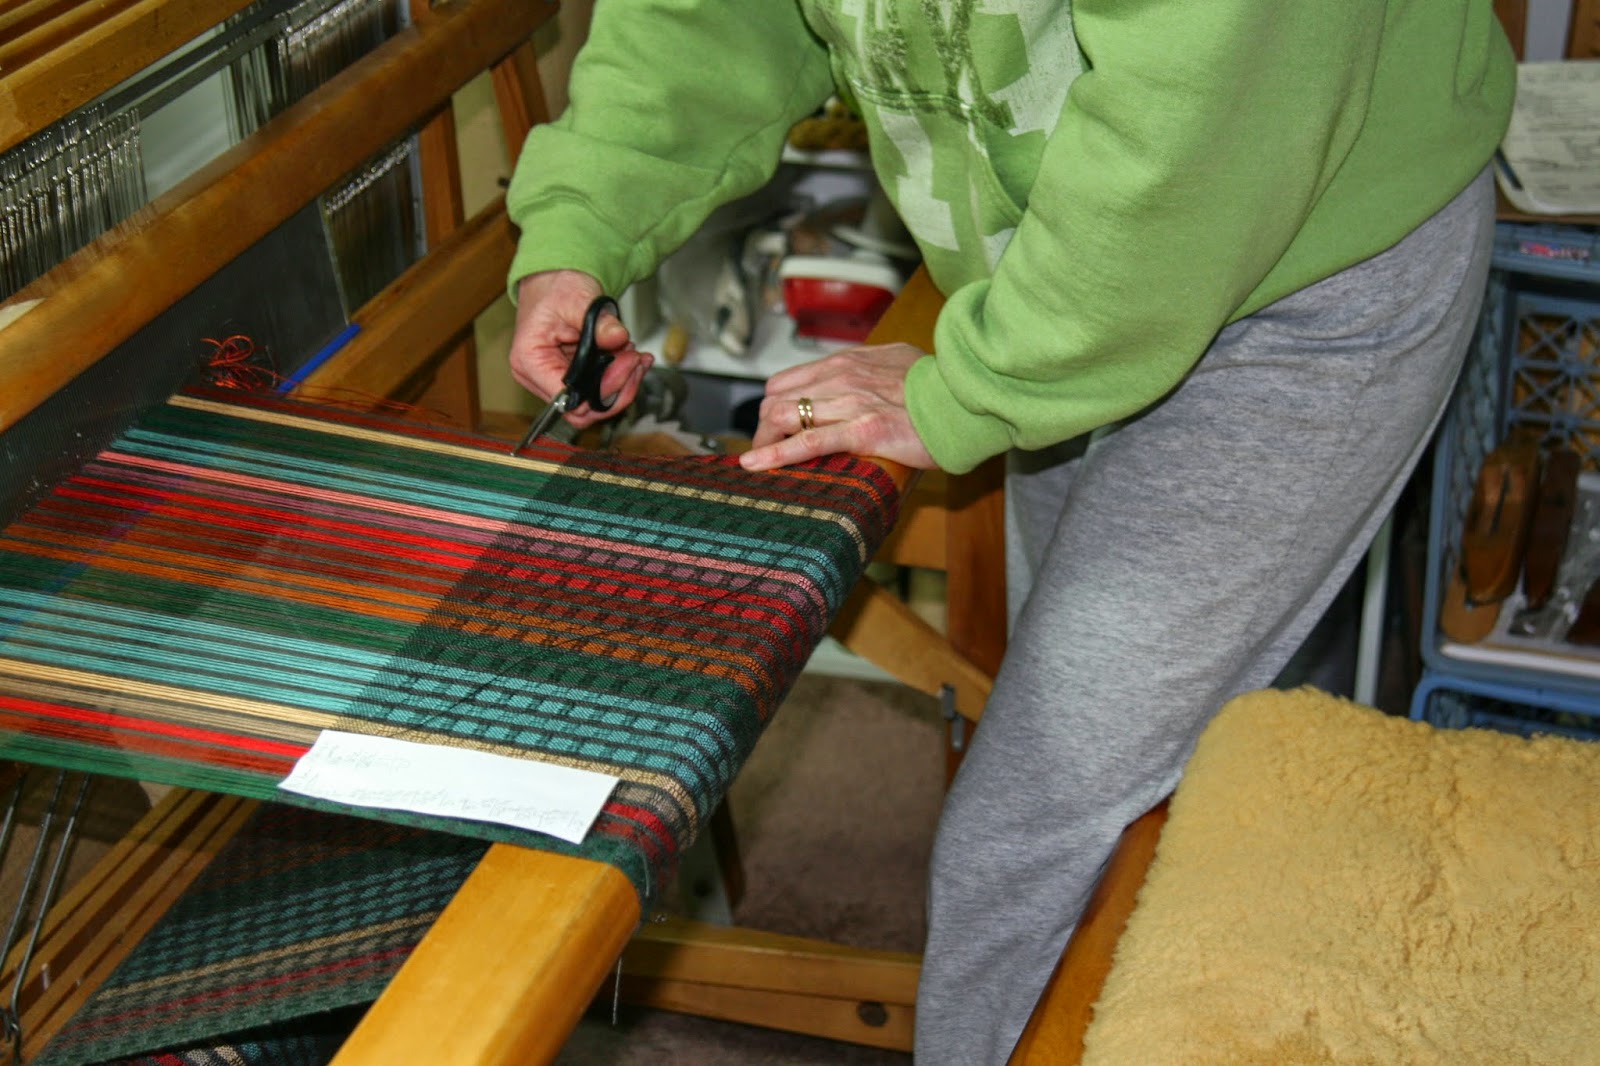
When we left our saga of the process of handweaving, I had cut the woven cloth off the loom and was going to wet-finish (i.e., wash) it by hand before I sewed it into an infinity wrap. The fabric is 100% 8/2 Tencel (trademark for lyocell, a sustainable plant-fiber yarn made using the same process as rayon). Like the silk it resembles, tencel should be hand-washed and hung or laid flat to dry.
After zigzagging the cut ends to prevent raveling, I take small scissors and trim off all the hanging weft threads that are the result of ending one bobbin of weft and starting a new one.

Then I turn under one short end of the fabric and machine stitch a 1/2" hem.


 Notice that the pinned raw edge is a generous 1/4" inside the selvedge edge of the bottom layer. This is a shortcut to making a type of flat-fell seam. I machine stitch this seam, about 1/4" inside the pinned raw edge.
The next step is to take the piece to the ironing board and open it out. The hemmed edge is now right side up (at the upper right in the photo) and the long selvedge edge of that layer is on top, covering the narrower raw edge layer of the seam. We are looking at the right side of the garment. I press the seam flat and closed, and pin. I stitch another seam 1/4" in from the pinned selvedge edge, thereby enclosing the short, raw edge inside the new seam: a kind of flat-fell seam. There are now two parallel lines of stitching along this edge.

Here's the completed seam. I apologize that the highly patterned fabric makes it hard to make out the stitched seams.

And here's the finished wrap. For this one I used a black weft that really makes those colored stripes pop.

When I started this series of posts, I wanted to answer this question: Why weave? Why would you make fabric and garments by hand, using slow, pre-industrial processes? Why should someone pay higher prices for these handmade garments--when it is so much easier and cheaper to buy mass-produced clothing?
Well, for me a large part of the answer is simply that I enjoy the process of weaving. I enjoy handling threads and fabric, and I enjoy the slow, meditative act of weaving itself. I enjoy wearing things I've made and I really love it when others enjoy wearing or giving as a gift something I have made.
But it's also an act of quiet rebellion on my part, a pushing back against disposable fashion and the troubling environments in which such fashion is made. I'm also rebelling in my small way against the fast-paced, automated, impersonal, use-it-and-throw-it-away world we live in. Now I am the first to confess that I am far from perfect on this score; most of my own clothes are made overseas and purchased from a chain store. I cannot (yet) weave and make my own blue jeans, underwear or winter coat. But by weaving a few garments I hope to remind myself and others that it is possible to be more mindful in our choices as consumers. Just as we might choose to buy organic food from a CSA (community-supported agriculture) because we value healthy bodies, a healthy earth, and local food production, so we might choose to buy a handwoven garment that can be enjoyed for years because we know that it was made locally, in a safe environment, from sustainable materials. We can see the hand of the maker in these things, and we know where they come from.
To see more of my recent work, click here for my website.
After zigzagging the cut ends to prevent raveling, I take small scissors and trim off all the hanging weft threads that are the result of ending one bobbin of weft and starting a new one.
Then I turn under one short end of the fabric and machine stitch a 1/2" hem.
The next part is the trickiest for me; I have to double- and triple-check that I've done it right every time. With the hemmed edge facing up on my right I take the other (short) end of the fabric and twist it once (only once!) and pin it to the top selvedge edge of the fabric, with its selvedge edge flush with the hemmed edge.
Here's a closeup. I pin it thoroughly and then I try on the piece and double-check in a mirror that the hem is on the inside and that there's only one twist in the fabric.
The next step is to take the piece to the ironing board and open it out. The hemmed edge is now right side up (at the upper right in the photo) and the long selvedge edge of that layer is on top, covering the narrower raw edge layer of the seam. We are looking at the right side of the garment. I press the seam flat and closed, and pin. I stitch another seam 1/4" in from the pinned selvedge edge, thereby enclosing the short, raw edge inside the new seam: a kind of flat-fell seam. There are now two parallel lines of stitching along this edge.
Here's the completed seam. I apologize that the highly patterned fabric makes it hard to make out the stitched seams.
And here's the finished wrap. For this one I used a black weft that really makes those colored stripes pop.
When I started this series of posts, I wanted to answer this question: Why weave? Why would you make fabric and garments by hand, using slow, pre-industrial processes? Why should someone pay higher prices for these handmade garments--when it is so much easier and cheaper to buy mass-produced clothing?
Well, for me a large part of the answer is simply that I enjoy the process of weaving. I enjoy handling threads and fabric, and I enjoy the slow, meditative act of weaving itself. I enjoy wearing things I've made and I really love it when others enjoy wearing or giving as a gift something I have made.
But it's also an act of quiet rebellion on my part, a pushing back against disposable fashion and the troubling environments in which such fashion is made. I'm also rebelling in my small way against the fast-paced, automated, impersonal, use-it-and-throw-it-away world we live in. Now I am the first to confess that I am far from perfect on this score; most of my own clothes are made overseas and purchased from a chain store. I cannot (yet) weave and make my own blue jeans, underwear or winter coat. But by weaving a few garments I hope to remind myself and others that it is possible to be more mindful in our choices as consumers. Just as we might choose to buy organic food from a CSA (community-supported agriculture) because we value healthy bodies, a healthy earth, and local food production, so we might choose to buy a handwoven garment that can be enjoyed for years because we know that it was made locally, in a safe environment, from sustainable materials. We can see the hand of the maker in these things, and we know where they come from.
To see more of my recent work, click here for my website.
Wednesday, March 18, 2015
Just call me Penelope*
Regular readers may recall I am weaving a series of small tapestries about Mary, the mother of Jesus. The most recent piece has been gestating since last fall, and I'm happy to report that I cut the piece off the loom yesterday.
 I'll show you the whole piece in a second but I want to back up a bit and share the most recent back-two-steps episode. Last weekend, I realized my failure to plan adequately was going to entail some serious un-weaving.
I had worked out the colors and values of the piece fairly coherently, but I had left the topmost portion of the design somewhat vague, thinking I'd know once I got there what to do. I'd have nearly the whole piece completed by then, and it should be obvious, right? So I moved ahead, using a very dark blue weft to fill in ever-greater portions of the top.

What I did not reckon on was that ONCE AGAIN, value trumps color. Every. Single. Time. "Value does all the work but color gets all the credit." I've heard it a million times. I've even repeated it when I teach. But I keep learning this lesson anew in my own work. The dark value of the blue yarn, and its solid, level tone (as opposed to the heathery, tweedy grey mixes I've used to suggest the rocks and the crevice above Mary's face) make it stick out like the proverbial sore thumb. It even sort of looks like a thumb pointing down here, which is appropriate. Or a funnel cloud. Not what I was going for.
I let it sit over the weekend, not wanting to face ripping out hours of work. I consulted my husband, my in-house value expert because he works in black-and-white photography, and he confirmed, Yes. It needs to come out.
So, it only took 45 minutes to take it all out. As I rewove that section I blended the dark blue yarn with the greys I was using elsewhere to suggest the rocks and crevice above Mary's head, and it made for a much happier transition.
 Here's the finished piece.

Well, the weaving is finished. You can see that there are lots of loose ends, both warps and wefts on the back, that need to be tucked in and tied off. I'll post another photo when it's really finished and mounted.
*Penelope was Odysseus' wife in the Greek epic The Odyssey. She was beset by mobs of obnoxious suitors while Odysseus was taking his sweet time getting home from the Trojan War. She promised the suitors she'd choose one to marry when she finished weaving the project on her loom. But ever the faithful wife, she un-wove every night what she had woven during the day, thereby putting off the day. It took the suitors a long time to catch on.
I had worked out the colors and values of the piece fairly coherently, but I had left the topmost portion of the design somewhat vague, thinking I'd know once I got there what to do. I'd have nearly the whole piece completed by then, and it should be obvious, right? So I moved ahead, using a very dark blue weft to fill in ever-greater portions of the top.
I let it sit over the weekend, not wanting to face ripping out hours of work. I consulted my husband, my in-house value expert because he works in black-and-white photography, and he confirmed, Yes. It needs to come out.
So, it only took 45 minutes to take it all out. As I rewove that section I blended the dark blue yarn with the greys I was using elsewhere to suggest the rocks and crevice above Mary's head, and it made for a much happier transition.
Well, the weaving is finished. You can see that there are lots of loose ends, both warps and wefts on the back, that need to be tucked in and tied off. I'll post another photo when it's really finished and mounted.
*Penelope was Odysseus' wife in the Greek epic The Odyssey. She was beset by mobs of obnoxious suitors while Odysseus was taking his sweet time getting home from the Trojan War. She promised the suitors she'd choose one to marry when she finished weaving the project on her loom. But ever the faithful wife, she un-wove every night what she had woven during the day, thereby putting off the day. It took the suitors a long time to catch on.
Thursday, March 12, 2015
The tale of a warp, Part 3
For the past two weeks I've been sharing in excruciating some detail the process by which I design, warp and weave a garment. When we left our tale, I had finished "dressing" the loom and tied up the treadles.

Now I begin the fun task of choosing the weft color--the thread on the bobbin in the shuttle above, that is thrown back and forth, interlacing with the warp on the loom. It is throwing the shuttle, in combination with pressing the foot treadles, that actually constructs the woven web of fabric. I always include at least 18" of extra warp when I plan a project so I have room for sampling various weft colors and treadling patterns that would change the appearance of the fabric. I'm often surprised at how the weft color changes the appearance of the warp. In this case, the customer who ordered this wrap specified a dark gray for the weft, so that decision was made. In the photo below you can just make out a couple of different treadling patterns I tried, with the Ms and Os pattern closest to the bottom being the one I used.

I always weave with my shoes off--allows my feet to feel the treadles and move between them more smoothly.
 As I press the treadles in sequence, the shafts of my counterbalance loom raise and lower, and a shed opens--the space between the raised and lowered warps--into which I throw the shuttle. For this Ms and Os pattern, with the threading and tie-up I'm using, the treadling sequence is 16161616 53535353. Even though my loom has six treadles, to make this pattern I need only use four.

 And that's how it's done, over and over again. For this piece, I wove about 72" with 20 picks, or throws of the shuttle depositing one weft thread, per inch. About 1400 throws of the shuttle in all, taking about 3 hours. I usually break up the weaving into shorter sessions spread over a few days to save wear and tear on my arms and shoulders.
After each pick, I grab the beater containing the reed and pull it against the fabric, pushing that just-woven thread up against the fabric underneath it. I have to use a consistent beat in order for the woven density of the fabric to be even --if I beat more gently some times and more firmly at other times, it shows in the fabric as looser and tighter sections, and I've learned the hard way that it can't be repaired later. A consistent beat is something that comes with hours of practice and with maintaining a regular rhythm in treadling, throwing the shuttle, and pulling the beater. It's physical work, but it's rhythmical too, a bit like dancing. Once your hands and feet learn the dance, your mind is free to wander a bit, if the treadling pattern is not too complex. Of course if your mind wanders too far you make mistakes.
I also keep an eye on the edges, or selvedges of the fabric, where the weft thread wraps around the edge warp thread before making its return trip across the fabric. I want to make sure the selvedges don't draw in too much, or have loose loops of fabric protruding. Loops can be fixed, laboriously, but draw-in cannot. Again, practice and an even rhythm make a huge difference here.

In the photo above where I'm using the beater, you can see a slip of paper pinned to the edge of the woven fabric--this is where I periodically record the number of inches I've woven since the start. When the woven web grows closer to the beater, I advance the warp by winding the cloth beam forward. Measuring and recording the inches I've woven as I go is the only way to know where I am in the project.
I almost never weave just one project from a warp, so I also wove another piece on this warp, using the same pattern and a black weft. Next week we'll look at how different the gray and black wefts appear against the bright stripes of the warp.
And then, when the weaving is all done, comes the hugely satisfying moment of cutting off. There is no fringe on this project, so I can cut the warp fairly close to the edge of the fabric.

Remember how I tied on all those little bundles of warp ends to the front? Now they have to be untied, and the shoelaces I used as warp spreaders before I started weaving can be removed too.

Next I will machine zigzag stitch the cut edges of the fabric to keep it from raveling, and then handwash the fabric and allow it to hang dry overnight. Then I'll finish constructing the infinity wrap.
Thanks for joining me on this journey--and tune in next time to see the finished projects.
P.S. Let me know if you have any use for my thrums. Free to a good home!

Now I begin the fun task of choosing the weft color--the thread on the bobbin in the shuttle above, that is thrown back and forth, interlacing with the warp on the loom. It is throwing the shuttle, in combination with pressing the foot treadles, that actually constructs the woven web of fabric. I always include at least 18" of extra warp when I plan a project so I have room for sampling various weft colors and treadling patterns that would change the appearance of the fabric. I'm often surprised at how the weft color changes the appearance of the warp. In this case, the customer who ordered this wrap specified a dark gray for the weft, so that decision was made. In the photo below you can just make out a couple of different treadling patterns I tried, with the Ms and Os pattern closest to the bottom being the one I used.
I always weave with my shoes off--allows my feet to feel the treadles and move between them more smoothly.
After each pick, I grab the beater containing the reed and pull it against the fabric, pushing that just-woven thread up against the fabric underneath it. I have to use a consistent beat in order for the woven density of the fabric to be even --if I beat more gently some times and more firmly at other times, it shows in the fabric as looser and tighter sections, and I've learned the hard way that it can't be repaired later. A consistent beat is something that comes with hours of practice and with maintaining a regular rhythm in treadling, throwing the shuttle, and pulling the beater. It's physical work, but it's rhythmical too, a bit like dancing. Once your hands and feet learn the dance, your mind is free to wander a bit, if the treadling pattern is not too complex. Of course if your mind wanders too far you make mistakes.
I also keep an eye on the edges, or selvedges of the fabric, where the weft thread wraps around the edge warp thread before making its return trip across the fabric. I want to make sure the selvedges don't draw in too much, or have loose loops of fabric protruding. Loops can be fixed, laboriously, but draw-in cannot. Again, practice and an even rhythm make a huge difference here.
In the photo above where I'm using the beater, you can see a slip of paper pinned to the edge of the woven fabric--this is where I periodically record the number of inches I've woven since the start. When the woven web grows closer to the beater, I advance the warp by winding the cloth beam forward. Measuring and recording the inches I've woven as I go is the only way to know where I am in the project.
I almost never weave just one project from a warp, so I also wove another piece on this warp, using the same pattern and a black weft. Next week we'll look at how different the gray and black wefts appear against the bright stripes of the warp.
And then, when the weaving is all done, comes the hugely satisfying moment of cutting off. There is no fringe on this project, so I can cut the warp fairly close to the edge of the fabric.
You may be thinking, But there's lots of warp left on the loom! There is always a certain amount of loom waste
in a project, warp that remains unwoven. Because of the way the loom is
constructed there is no way to insert the shuttle in a shed right up to
the end of the warp . On my loom I usually allow 26" for loom waste.
These leftover warp threads are known as thrums, and weavers have
endless discussions about what to do with their thrums. For now I'm
just throwing mine in a basket where they collect dust.
And then I pull the fabric off, and it unspools from the cloth beam in, I hope, all its glory and with no glaring errors.
Remember how I tied on all those little bundles of warp ends to the front? Now they have to be untied, and the shoelaces I used as warp spreaders before I started weaving can be removed too.
Next I will machine zigzag stitch the cut edges of the fabric to keep it from raveling, and then handwash the fabric and allow it to hang dry overnight. Then I'll finish constructing the infinity wrap.
Thanks for joining me on this journey--and tune in next time to see the finished projects.
P.S. Let me know if you have any use for my thrums. Free to a good home!
Thursday, March 5, 2015
The thrilling tale of a warp, part 2
Last week, I started a series of posts about the steps involved in making a handwoven garment. In the first installment we saw how the warp yarn is measured out and "beamed" (wound between layers of cardboard on the loom's back beam). The warp forms the lengthwise grain of the fabric.

The next step is threading, inserting each thread one at a time through a metal heddle attached to one of the shafts. A moment for vocabulary: the shafts or harnesses are wooden frames that move up and down as the weaver presses the foot pedals, or treadles, of the loom in sequence. The combination of threading and treadling sequences creates the woven pattern seen in the fabric.
You can see in the photo below that the heddles, about 200 on each shaft, are attached to metal bars at the top and bottom of each wooden shaft. My loom has four shafts, allowing for a wide variety of patterns, but many looms have 8, 16, or even more shafts, allowing for an almost infinite variety of increasingly complex patterns.

I am inserting each warp thread through the center "eye" of the correct heddle. The heddles are threaded in a particular sequence (in this case 1234 1212 3434 1234 1313 2414 repeated 14 times--a traditional pattern called Ms and Os) on the shafts to produce a pattern. Weavers tend to mutter long strings of numbers under their breath; there is a lot of counting involved in weaving.

Above you can see that most of the warp has been threaded through the heddles and I am threading the last remaining warp ends. Below all the heddles have been threaded.

After threading, the warp threads must be inserted through a comb-like reed that spaces them evenly for the full width of the piece. The stainless steel reed (with bright blue top and bottom edges in the photo below) sits in the beater, a wooden frame that the weaver uses to "beat" or press each weft pick into place in the fabric (more on this next time). At this point I have to re-configure the loom, taking away temporary tools like the raddle and putting back in place the beater and the breast beam that I had removed at the start for easier beaming and threading.
 The threads must be centered in the reed, so I measure half the width of the fabric out from the center of the reed (here, 9-1/2") and start inserting the threads, or sleying the reed, there. I use a long hook to pull them through each slot in order. In this case two threads are pulled through each slot for the proper density, or sett, of the fabric (here, 24 ends per inch).
 After sleying the reed, the front ends of the warp will be tied on to the front of the loom so that the entire warp is held under tension from front to back. Luckily the warps can be tied on in little bunches, not individually! I tug each bundle three times, working my way across, to make sure the tension on each one is equal.

Don't they look pretty all tied on?

Next I spread the warp by weaving in some waste yarn, to bring those bunches closer together. I like to use shoelaces since they are easy to remove later and can be re-used. I have heard of folks using all sorts of things for waste weft, including toilet paper and plastic bags!

Once the warps are fairly evenly spaced, one step remains before I can finally start weaving. I need to tie each shaft in the correct combination to the treadles below, to yield the woven pattern I want. This is called tying up. Referring to my handy cheat sheet, I get down on the floor and tie up the heddles appropriately. Here you can see that each treadle has two shafts attached to it.


When I was first learning to weave in classes at the Chattahoochee Handweavers Guild here in Atlanta, it took me five weeks of class sessions (out of the 8-week class) for me to get the loom completely warped. I remember complaining, "I don't know why anyone would choose to do this more than once!" All I wanted to do was start throwing that shuttle and weave! Nowadays I can wind a warp and warp the loom in a day, though usually I spread it out over a day or two.
Tune in next time for the exciting conclusion to our tale--actually weaving!
P.S. Many thanks to my dear husband Sam for taking the photos in this series of posts.
The next step is threading, inserting each thread one at a time through a metal heddle attached to one of the shafts. A moment for vocabulary: the shafts or harnesses are wooden frames that move up and down as the weaver presses the foot pedals, or treadles, of the loom in sequence. The combination of threading and treadling sequences creates the woven pattern seen in the fabric.
You can see in the photo below that the heddles, about 200 on each shaft, are attached to metal bars at the top and bottom of each wooden shaft. My loom has four shafts, allowing for a wide variety of patterns, but many looms have 8, 16, or even more shafts, allowing for an almost infinite variety of increasingly complex patterns.
I am inserting each warp thread through the center "eye" of the correct heddle. The heddles are threaded in a particular sequence (in this case 1234 1212 3434 1234 1313 2414 repeated 14 times--a traditional pattern called Ms and Os) on the shafts to produce a pattern. Weavers tend to mutter long strings of numbers under their breath; there is a lot of counting involved in weaving.
Above you can see that most of the warp has been threaded through the heddles and I am threading the last remaining warp ends. Below all the heddles have been threaded.
After threading, the warp threads must be inserted through a comb-like reed that spaces them evenly for the full width of the piece. The stainless steel reed (with bright blue top and bottom edges in the photo below) sits in the beater, a wooden frame that the weaver uses to "beat" or press each weft pick into place in the fabric (more on this next time). At this point I have to re-configure the loom, taking away temporary tools like the raddle and putting back in place the beater and the breast beam that I had removed at the start for easier beaming and threading.
Don't they look pretty all tied on?
Next I spread the warp by weaving in some waste yarn, to bring those bunches closer together. I like to use shoelaces since they are easy to remove later and can be re-used. I have heard of folks using all sorts of things for waste weft, including toilet paper and plastic bags!
Once the warps are fairly evenly spaced, one step remains before I can finally start weaving. I need to tie each shaft in the correct combination to the treadles below, to yield the woven pattern I want. This is called tying up. Referring to my handy cheat sheet, I get down on the floor and tie up the heddles appropriately. Here you can see that each treadle has two shafts attached to it.
When I was first learning to weave in classes at the Chattahoochee Handweavers Guild here in Atlanta, it took me five weeks of class sessions (out of the 8-week class) for me to get the loom completely warped. I remember complaining, "I don't know why anyone would choose to do this more than once!" All I wanted to do was start throwing that shuttle and weave! Nowadays I can wind a warp and warp the loom in a day, though usually I spread it out over a day or two.
Tune in next time for the exciting conclusion to our tale--actually weaving!
P.S. Many thanks to my dear husband Sam for taking the photos in this series of posts.
Subscribe to:
Posts (Atom)